s3를 이용하여 단축 Url 서비스 만들기
만들게 된 이유
필자는 코드 공유시 tio.run 라는 사이트를 주로 사용한다.
지원하는 언어의 수도 많고 디자인도 심플해서 자주 사용하는데 공유 기능을 사용할때 문제가 생겼다.
공유시 주소에 인코딩한 코드를 넣는 방식이라 주소가 너무 길어진다는것이다.
이런 문제 해결을 위해서 url 단축기를 만들기로 했다.
url 단축 방식
url 단축기를 만든다고하면 db에 단축주소와 연결주소를 저장하고 단축 주소 접속시 리다이렉트 하는 방식을 생각 할 것이다.
하지만 이런 방법은 db 를 사용하기 때문에 신경쓸 부분이 많아진다.
그래서 찾은 방식이 이것이다.
s3에 저장되는 파일은 다양한 메타데이터를 가지고 있다.
그중에 Website Redirect Location은 해당 파일 접근시 리다이렉트 하는 기능을 가지고 있다.
이것을 이용해서 만들어보자.
aws 설정
먼저 s3에 버킷을 만든다.
필자는 short.hotkey.sh 이라는 이름으로 버킷을 만들었다.
여기서 바로 파일을 만들고 메타데이터를 설정해도 상관은 없지만 s3에서 주는 주소는 너무 길어 짧은 주소라고 보기 힘들다. 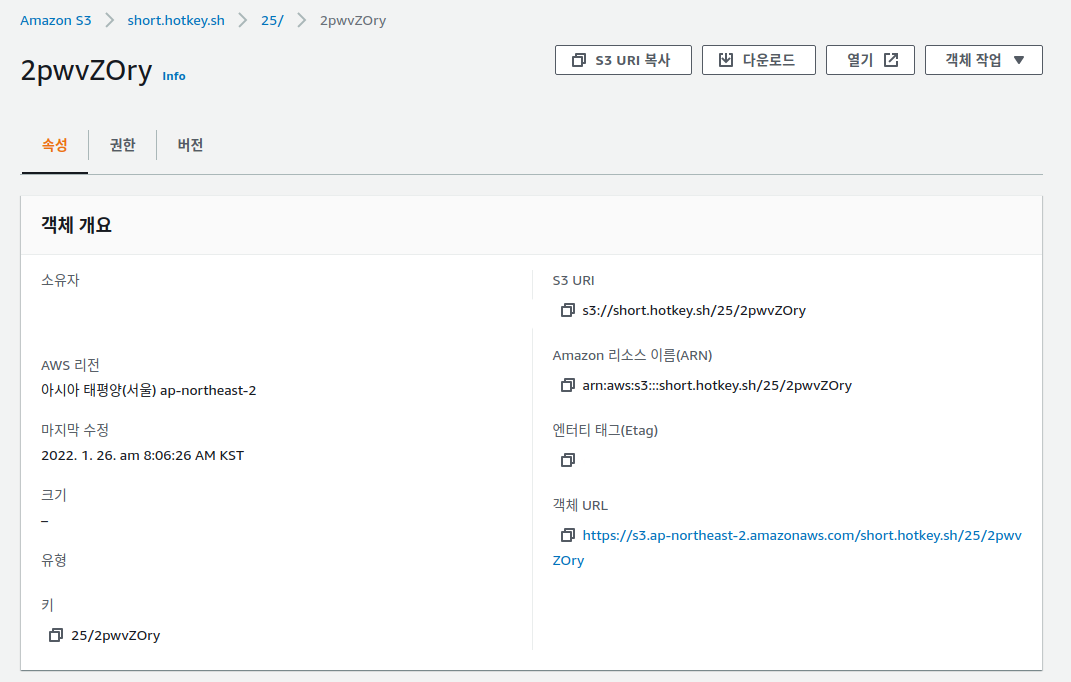
그래서 다음으로는 CloudFront를 이용해서 도메인을 버킷이랑 연결했다.
연결하는 방법은 아래 주소를 잠고하면 된다.
[AWS] CloudFront와 S3 연결하기
이러면 aws 에서 준비는 끝이다.
단축 서버 만들기
그러면 이제 위에서 만든 s3를 이용하는 서버를 만들어보자.
필자는 aws lambda에서 ts를 이용하여 만들었다.
처음으로 파일명에 사용하기 위한 랜덤 문자열을 만드는 함수부터 만들었다.
1
2
3
4
5
6
7
8
9
10
11
12
13
private static input =
  "abcdefghijklmnopqrstuvwxyzABCDEFGHIJKLMNOPQRSTUVWXYZ0123456789";

public static GetRandomString(length: number) {
  let result = "";
  let charactersLength = RandomGenerator.input.length;
  for (let i = 0; i < length; i++) {
    result += RandomGenerator.input.charAt(
      Math.floor(Math.random() * charactersLength)
    );
  }
  return result;
}
다음으로 s3에 접근하는 부분을 싱글톤을 이용해서 만들었다.
1
2
3
4
5
6
7
public static get S3(): AWS.S3 {
  if (this.s3 === null) {
    this.s3 = new AWS.S3({ apiVersion: "2006-03-01" });
  }
  return this.s3;
}
private static s3: AWS.S3 = null;
파일명은 날짜 + 랜덤 문자열을 이용하여 만든다.
1
2
3
4
5
6
7
8
9
10
11
let fileKey = "";

try {
  while (1) {
    fileKey = `${dayjs().date()}/${RandomGenerator.GetRandomString(8)}`;
    await Define.S3.headObject({
      Bucket: Define.BucketName,
      Key: fileKey,
    }).promise();
  }
} catch {}
중복 파일명이 있는지 확인하기 위해 headObject를 사용했다.
headObject는 해당 파일이 없을시 objectNotExists 오류를 반환한다.
이걸 이용하여 try catch 와 while로 중복되는 파일명이 없을때까지 반복한다.
이후 만든 파일 이름을 이용해서 WebsiteRedirectLocation 값으로 리다이렉트할 주소를 넣어서 저장하면 된다.
1
2
3
4
5
6
7
8
await Define.S3.putObject({
  Bucket: Define.BucketName,
  Key: fileKey,
  ACL: "public-read",
  Body: Buffer.from([]),
  ContentType: "text/html",
  WebsiteRedirectLocation: data.urlData,
}).promise();
마지막으로 만든 파일명을 반환하면 끝이다.
1
2
3
4
5
6
7
8
9
10
11
12
const response = {
  headers: {
    "Access-Control-Allow-Origin": "*",
    "Access-Control-Allow-Credentials": true,
  },
  statusCode: 200,
  body: JSON.stringify({
    url: `https://s.hotkey.sh/${fileKey}`,
  }),
};
callback(undefined, response);
return;
코드 전문
1
2
3
4
5
6
7
8
9
10
11
12
13
14
15
16
export default class RandomGenerator {
  private static input =
    "abcdefghijklmnopqrstuvwxyzABCDEFGHIJKLMNOPQRSTUVWXYZ0123456789";

  public static GetRandomString(length: number) {
    let result = "";

    let charactersLength = RandomGenerator.input.length;
    for (let i = 0; i < length; i++) {
      result += RandomGenerator.input.charAt(
        Math.floor(Math.random() * charactersLength)
      );
    }
    return result;
  }
}
1
2
3
4
5
6
7
8
9
10
11
12
13
14
15
export default class Define {
  public static BucketName: string = "short.hotkey.sh";

  // ===============================S3================================
  public static get S3(): AWS.S3 {
    if (this.s3 === null) {
      this.s3 = new AWS.S3({ apiVersion: "2006-03-01" });
    }
    return this.s3;
  }
  private static s3: AWS.S3 = null;
  // =================================================================

  public static region = "ap-northeast-2";
}
1
2
3
4
5
6
7
8
9
10
11
12
13
14
15
16
17
18
19
20
21
22
23
24
25
26
27
28
29
30
31
32
33
34
35
36
37
38
39
40
41
42
43
44
45
46
47
48
49
50
51
52
53
54
55
56
57
58
59
60
import { Handler, Context, Callback } from "aws-lambda";
import dayjs from "dayjs";
import Define from "./Define";
import RandomGenerator from "./Function/RandomGenerator";

export const handler: Handler = async (
  event: any,
  context: Context,
  callback: Callback
) => {
  const data = new HasuraInputData().LoadFromJsonString(event.body);
  console.log(event.body);

  let fileKey = "";

  try {
    while (1) {
      fileKey = `${dayjs().date()}/${RandomGenerator.GetRandomString(8)}`;
      await Define.S3.headObject({
        Bucket: Define.BucketName,
        Key: fileKey,
      }).promise();
    }
  } catch {}

  await Define.S3.putObject({
    Bucket: Define.BucketName,
    Key: fileKey,
    ACL: "public-read",
    Body: Buffer.from([]),
    ContentType: "text/html",
    WebsiteRedirectLocation: data.urlData,
  }).promise();

  const response = {
    headers: {
      "Access-Control-Allow-Origin": "*",
      "Access-Control-Allow-Credentials": true,
    },
    statusCode: 200,
    body: JSON.stringify({
      url: `https://s.hotkey.sh/${fileKey}`,
    }),
  };
  callback(undefined, response);
  return;
};

class HasuraInputData {
  public urlData: string;

  public LoadFromJsonString(jsonString: string): HasuraInputData {
    return this.LoadFromJson(JSON.parse(jsonString));
  }

  public LoadFromJson(jsonData: any): HasuraInputData {
    this.urlData = jsonData.input.url_data as string;
    return this;
  }
}
프론트 만들기
프론트는 next.js 를 사용하여 간단하게 만들었다.
프론트부분은 특별한 설명이 필요없을 정도로 간단하게 위에서 만든 서버에 요청을 보내고
결과값을 보여주는게 끝이다.
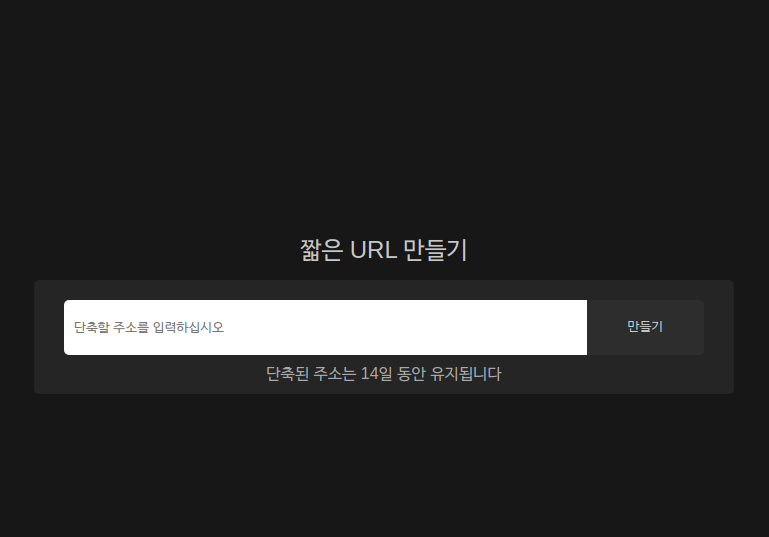
완성한 결과물
완성한 결과물이다.
단축할 주소를 입력하고 만들기 버튼을 누르면 짧은 주소가 나온다
참고한 자료
https://aws.amazon.com/ko/blogs/compute/build-a-serverless-private-url-shortener/
https://stackoverflow.com/questions/36830462/shorten-s3-signed-url